You can make your regular Daikin air conditioner fully controllable from Home Assistant for the price of a coffee. Using a tiny ESP8285 ESP-01M module, you can build a Wi-Fi bridge that can both read and send signals to your AC. Once flashed with ESPHome, this board behaves as a smart thermostat that talks directly to Home Assistant.
This method features a clever trick: instead of relying on the ESP module's built-in IR receiver, we'll tap directly into the Daikin AC's existing remote receiver board, allowing Home Assistant to see the status changes made by your original remote!
What this project does
- Adds Wi-Fi control to a standard infrared AC unit
- Works with Home Assistant as a normal Climate entity (temperature, mode, fan, etc.)
- Still lets you use your original remote
- Runs entirely locally with no cloud service
Hardware you will need
- ESP8285 ESP-01M with IR transceiver - a compact Wi-Fi module that already includes an onboard infrared transmitter and receiver, allowing it to both send and capture IR remote signals without adding external IR components. It’s sold on AliExpress for about 3.5 EUR
- USB-to-Serial adapter - needed to connect the ESP8285 ESP-01M to your computer for the first flash. I bought CH340G module from AliExpress for about 1.5 EUR
- Dupont jumper wires
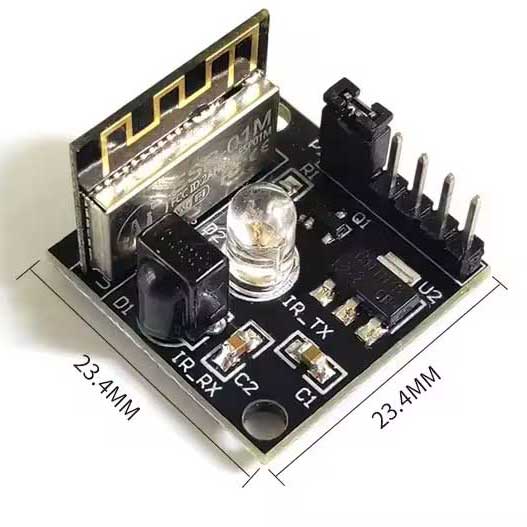
ESP8285 ESP-01M
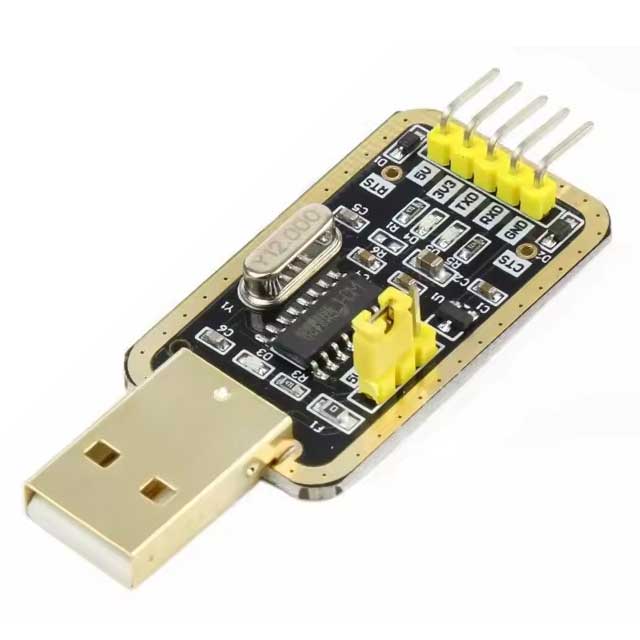
USB-to-Serial adapter
Building and flashing
- Connect the USB-to-Serial adapter to the ESP module (5V, GND, RX, TX) ensuring the RX and TX lines are crossed (TX → RX, RX → TX).
- Connect a jumper wire between GPIO 0 and Ground (GND) to enter flash mode on the ESP module.
- Now, connect the USB-to-Serial adapter to the computer.
- Install ESPHome in Home Assistant.
- Go to ESPHome > New Device. Enter name for the device and click Next. You will be prompted to select your device type, choose ESP8266 and click Next. Skip installing the configuration to your device.
- In the ESPHome dashboard, find your new device and click Edit. Paste the provided YAML code at the end of the file and click Save.
- Next, click Install and, when prompted with 'How do you want to install the YAML on your device?', select Plug into this computer.
- Now, you'll need to select the correct serial port for your connected device.
- After flashing is complete, disconnect the USB-to-Serial adapter from the ESP module. The programmer is no longer needed.
- Remove the jumper wire from GPIO 0 to Ground. This allows the module to boot into its normal operating mode.
- The ESP module is now ready to be connected to the Daikin AC's remote board for permanent installation and power.
- On reboot, it connects to your Wi-Fi and appears in the ESPHome dashboard. From that point on, all future updates are over-the-air.
# Infrared receiver settings
remote_receiver:
  id: ir_receiver
  pin:
    number: GPIO3
    inverted: true
    mode:
      input: true
      pullup: true
  tolerance: 55%
  dump: all

# Infrared transmitter settings
remote_transmitter:
  id: ir_transmit
  pin: GPIO4
  carrier_duty_percent: 50%

# Climate entity that maps to your AC brand protocol.
climate:
  - platform: daikin                  # Change platform to match your AC if not Daikin
    name: "Bedroom AC"                # Display name in Home Assistant
    id: climate_ac
    transmitter_id: ir_transmit
    receiver_id: ir_receiver
Connections Overview
⚠️ Safety First! It is crucial to verify the voltage and ground pins on your AC's remote board using a multimeter. The pinout may vary between different AC models. Proceed with caution, as any damage resulting from incorrect wiring is your sole responsibility. You will be connecting three points from your Daikin AC's remote receiver board to the ESP module:
- AC 5V DC → ESP Module 5V Input
- AC Ground (GND) → ESP Module Ground (GND)
- AC IR RX Signal → ESP Module GPIO 3 (this pin is usually the RX pin used for flashing, but we re-purpose it)
The ESP module’s built-in IR Transmitter (TX) will remain connected to its default pin (GPIO 4) for sending commands to the AC unit.
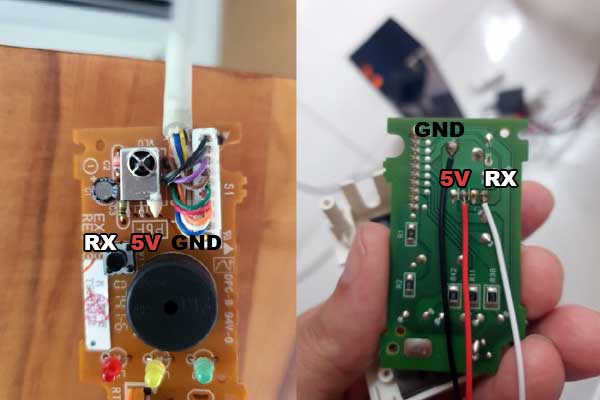
Daikin remote receiver. Direct connection to the three legs of the IR receiver diode.
⚡️ Working with High Voltage: The AC unit contains sections with mains voltage (120V/240V). When opening the unit and working on the low-voltage board, you are in proximity to high-voltage components. Always disconnect the main power breaker to the AC unit before opening the cover and making any internal connections.
⚠️ Disclaimer: All information, wiring instructions, and configuration examples provided in this post are for educational purposes only. Working with electronic components involves risk, including potential damage to your devices. Always double-check wiring, ensure correct voltage levels, and avoid powering circuits from unsafe sources. By following these instructions, you agree that you do so at your own risk. If you are not confident with soldering or electronics, seek assistance from someone experienced.